For December’s craft I wanted to do a Christmas countdown, and I decided that you would need it this month to get it completed so you can start counting down.
You have two options for your choice of countdown.
The first option is the countdown cubes,
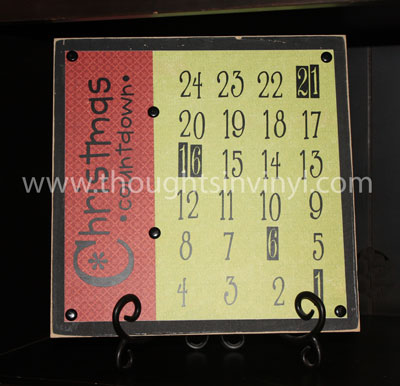
and the second option is a countdown magnet board.
{The cubes you can just rearrange them to display the # of days left until Christmas and the magnet board you can just move a magnet to the correct # of days left until Santa comes.}
Christmas Countdown Cubes
Countdown Cubes Kit Price $9.50
(regular price $11.50)
Countdown Cubes Kit includes:
two 3 1/2 inch x 3 1/2 inch cubes
one 8 1/2 inch board to sit them on
Vinyl (choose between black, white, or cream)
How to Assemble:
1. Paint the wood.
2. Cut 12 pieces of 3 inch x 3 inch scrapbook paper.
3. Once the wood is dry, mod podge the scrapbook paper on to the blocks.
4. Once the mod podge is dry sand all the edges (if desired) and then add the vinyl.
5. Seal your entire project with another coat of mod podge.
6. Allow to dry for 2-3 days before stacking so your mod podge can cure completely and won’t cause the boards to stick together.
Christmas Countdown Magnet Board
Countdown Magnet Board Kit Price $13.00
(regular price $15.00)
Countdown Magnet Bord Kit includes:
11 x 11 board
10 x 10 sheet of metal
vinyl (choose between black, white, or cream)
How to assemble:
1. Paint the edges and a half inch around the top sides of the board.
2. Apply an 10″ x 10″ piece of scrapbook paper to metal using modpodge.
3. Apply a 3 1/2″ x 10″ piece of scrapbook paper to one side of the 10″ x 10″ paper Mod Podge. This paper will overlap the first paper.
4. Apply vinyl to pager.
5. Get creative! Add ribbon, ricrac, buttons, or whatever your heart desires.
6. Attach the metal to the board by using gorilla glue, Welder glue, or apoxy. I always use gorilla glue, make sure to read the instructions. This glue expands a lot, so a little goes a long way! While the glue is drying I cover my project with a piece of regular paper and then run a strip of tape across the top of that piece of paper so when I remove the tape it won’t tear the scrapbook paper off.
7. Protect your paper with a coat of Mod Podge over the entire surface.
Sale prices end December 5th.